Add A Realistic Old Photo Effect To Any Photo Using Photoshop
- May 17, 2016
- 1 min read
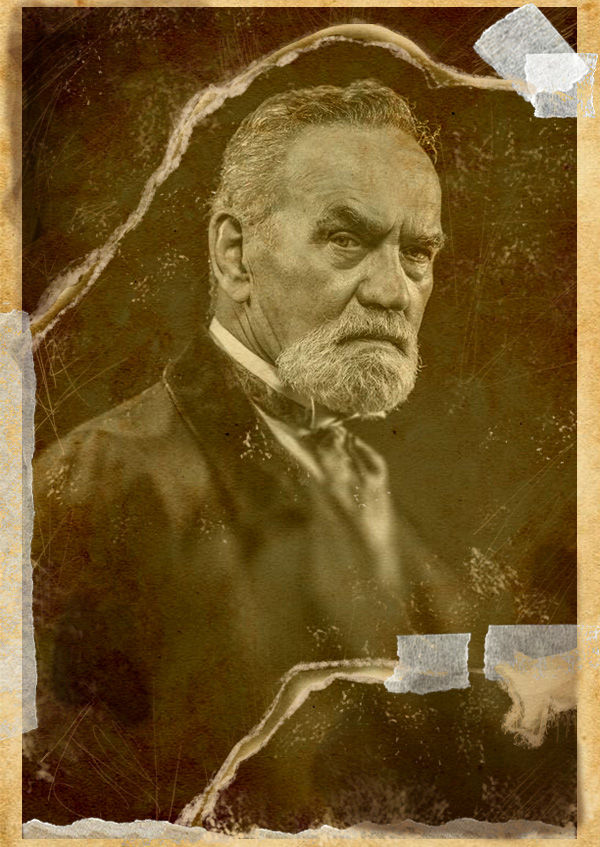
Let’s turn back the hands of time! In this fun tutorial, add a vintage looking effect to any photo just like grandpa’s time. We’ll use a combination of Layer Blend Modes and Brushes to create this super realistic antique look. Great for beginners too, let’s begin!
Software: Adobe Photoshop CC Difficulty: Beginner Completion Time: 1 hour
Final Image:

Images Used For This Tutorial: 32035027 © Ysbrand Cosijn
Setup The Photo Step 1 Open your reference in Photoshop. For this effect, it helps if you use a subject that can be easily adaptable to an olden style. Here, I’m using a picture of an older man in the perfect vintage attire that you can get here: Bearded man portrait
Let’s adjust the size of it to keep the photo from bleeding into the edges. This will also help give it that white border just like old images. Go to Image > Canvas Size and set the width and height to 8.5 x 12 inches with the Canvas Extension Color set to white.
Step 2 Next, add a New Adjustment Layer for Hue & Saturation. De-saturate the photo by adjusting the Saturation to -100 and the Lightness to +31.
Step 3 Now let’s add the first round of antique to this photo. Grab a worn paper stock and apply it to your photo for a sepia-like color effect and texture. Adjust the size to stretch over the photo and set the Layer Blend Mode to Linear Burn.
Creating the Torn Photo Effect Step 4 To recreate the look of a torn photo we’ll need the Lasso Tool (L). Select the tool and make small scribbles around to simulate torn edges all around the photo. Then fill the edges in with a solid tan color (#e1bb73) on a new layer to blend into the paper.
Create a New Layer above the paper edges and set it as a Clipping Mask. Set the layer to Multiply and use a dark brown color to paint soft shadow underneath the paper using the Brush Tool (B).
Now the edges are way too clean. So use a Chalk Brush to add texture to the torn paper.
Step 5 The only way the photo can hold together is if we use some tape! Extract some tape from your stock reference and Copy and Paste it onto your canvas. Adjust the sizes of each tape with the Free Transform Tool (Control-T) and try to make the arrangement interesting. Set the layers of the tape to Lighter Color to help blend the tape into the photo for a more natural look.
Step 6 A lot of older photography is composed with an interesting blur that gradually recedes to the background or the foreground. This also creates a unique play on depth of field. To do this effect, use the Rectangular Marquee Tool (M) to make a selection around the main photo. Then go to Filter > Blur Gallery > Tilt Shift and add a horizontal Blur of 15 pixels and 0% Distortion.
Final Scratches and Burns Step 7 Since we’re almost finished, it’s time to add some more texture to the photo. Using the Chalk Brush we used from earlier, paint texture all across the photo with a light tan color. Play with the size of your brush and vary the opacity to intensify the effect. Switch the brush to a tiny Hard Round Brush (B). Paint scratches all over the photo while using the Eraser Tool (E) if you need to in order soften the scratches.
Step 8 Last but not least, the burns! Set a new layer to Multiply and begin painting soft black burns using a Soft Round Brush (B). This helps to mimic the color discoloration that happens to photos over time.

And that’s it! The final result leaves you with an antiqued photo full of character and charm. Have fun trying out this old photo effect on your pictures, and let us know how you liked this tutorial in the comments below!


Comments