
Level: Advanced Program: Photoshop CS6, Windows 10 Time: 4 hours
What We Will Be Learning: In this tutorial, we will be putting together a friendly forest scene of a girl and bear! We will be learning an easy way to extract fur using brushes, completely change the color of an image using multiple color adjustment layers, and how to create more realistic shadows and lighting.
This tutorial assumes you have knowledge of basic Photoshop functions such as adjustment layers, layer masks, and layer effects. If you love photo manipulation, you’ll love this!
Images Used: Forest: #41128338
Child: #43540425
Bear: #20482663
Leafs: #23060519
Note: At the end of each step there is an image of what my layers look like at the point of that step in case you get lost!
Step One: Prepping the Background First, find yourself a forest background image (image#41128338). We are going to adding some extra light and contrast using adjustment layers.
1. Create a Brightness/Contrast adjustment layer. Settings: Brightness -43, Contrast -19, 75% opacity. 2. Using a large, black, round paint brush paint on the layer mask to mask out the middle and tree area. The red area below shows what areas I masked out:

1. Create another Brightness/Contrast adjustment layer. Settings: Brightness -30 and Contrast 11. 2. Using the same black brush as before mask out the top diagonal half of the adjustment layer. Again, the red area below shows where I masked out:

Lastly, create a Curves adjustment layer to hike up the highlights. Here are the settings:

Mask out the bottom half and inner middle of the adjustment layer. Again, the red area below shows where I masked out:

Here’s the finale background:

Group all the layers together and name it “Background”.
Layers:

Step Two: Adding the Bear The trick to cutting out your bears (image#20482663) fur is to first roughly cut out your bear then mask the fur back in using a brush.
1. Add a layer mask to your bear’s layer. 2. Very roughly mask out your bear. You can use a hard round brush or the lasso tool. Just make sure you mask close to your bear’s body, so, for now, the end of the fur is masked out. Here is what the edge of my bear looks like.

1. Using either a white “fur” or “grass” brush (adobe’s default grass brush will work!) go around the edges and mask back in the fur stands. The grass/fur brush will give the effect of new stands. Change the angle and size as needed, paying attention to the direction and size of the fur on the bear’s body. Ignore the feet for now. Here is what my fur ended up as:

Now that your fur is all back in we have to do the feet. As our bear is sitting in leaves we want to make it see some leaves are up against his feet, or else he will look like he is floating. Mask out some leaves of the leafs using either the Pen tool or a hard round brush. Below is how mine turned out and what I ended up masking:


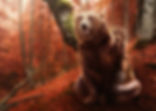
Here is my image thus far:

Next, we will be adding our bear’s shadows. All of which will be painted in a dark brown (#0e0a08)
1. Create a new layer, clip it into your bear layer, and set it to “Soft Light”. 2. Using a medium, soft, round brush with a very low Flow (5-20%) paint in the leg, arm, and belly creases and the bottom of the bear.

1. Create and clip another layer and set it to “Multiply”. 2. Using the same brush and color, paint the lower middle and bottom of your bear. Build up the shadows slowly, and be patient! Not rushing it is key, shadows can be very tricky, and mostly just take practice.

1. Create another new layer, in your bear layer, and set it to “Soft Light”. 2. Using the same brush and the color black, darken up the upper sides and paws of the bear as there is not the much backlighting. This will make him blend into his environment more.

1. Create and clip yet another layer and set it to “Overlay”. 2. Using a small, black, soft round brush paint more detailed shadows in the fur and face. Look for the already existing shadows and enhance what is already there. 3. To finish it off we are going to add some highlights by creating a clipping another “Overlay” layer into your bear. 4. Using the same brush, only this time in white, paint over the existing highlights. Especially in the face and eyes. You want him to look very stylized.

To finish off our bear we are going to do some color correcting to him with some adjustment layers.
1. Create and clip a Brightness/Contrast adjustment layer. Settings: Contrast -27. 2. Above that, create and clip a Curves adjustment layer. Settings:

1. Above that, create and clip a Color Balance adjustment layer. Settings: Red +32, Blue +17.

Group all your bear layers together and name the group “Bear”
Layers:
Step Three: Creating Shadows Next, we will move on to the background shadows so the bear looks like his is a part of his environment, and not just floating there.
1. Create a new layer under your “Bear” group. Set it to “Overlay”. 2. Using a medium to large, soft, round brush paint black towards the bottom of the forest image, on the bottom side of the tree in the middle, and along the sides of the tree in the back. 3. Switch your color to white. Paint white in the upper left corner of the sky, behind your bear and on the back part of the leafs on the ground. We are trying to make the forest look more contrasted and stylized.

1. Create a new layer above the layer you just created. Set it to “Multiply”. 2. Using the same dark brown color as before (#0e0a08) paint the bear’s main shadow in front of the bear. Lower the layers opacity if needed.

1. Create a new layer above the layer you just created. Set it to “Soft Light”. 2. With a smaller brush paint directly below your bear, very closest to his body, around his feet, and on the tree directly behind him.

1. Finally, create a new layer above the layer you just created. Keep it set it to “Normal”. 2. With a large, soft, white brush paint behind your bear to add a back light.

Group all the layers you just created together and name it “Bear Shadow/Light”
Layers:

Step Four: Adding the Girl Next, we are going to add our little girl to the image, using a lot of the same methods we used on the bear.
First, extract and place your little girl (#43540425).

Now, we are going to make it so it looks like some of the bear’s fur is overlapping onto her. We are going to do this is almost the same exact we created the bear’s fur. Using the same brush as you did with the fur, only this time in black and painting inward, paint along the left side and the legs of the girl. Change the size and angle as needed.

Let’s move on to the shadows and highlights.
1. Create and clip a new layer into the girl. Set it to “Overlay”. 2. Using a small, soft, round brush with a very low flow rate (5-20%) paint back over the girls already existing shadows on her face to give her more contrast. 3. Also, paint a large amount of black on the left side of the girl’s hair as it’s closest to the bear and so needs to be shaded. 4. Above that layer, create and clip a new layer. Set it to “Overlay”. 5. With the same brush, but set to white, paint over the girl’s natural hair and face highlights to enhance them. 6. One the same layer, paint white on the girl’s outer hair/hair strands.

1. Above those layers, create and clip a new layer and set it to “Multiply”. 2. Using a medium, soft, round brush with a very low brush rate (5-20%) paint brown (#342417) on the side and bottom of the little girl’s body. Lower the opacity if you need to.

Next, let’s do some color correction just as we did to our bear.
Create and clip a Curves adjustment layer. Settings:

Create and clip a second Curves adjustment layer. Settings:

1. Create and clip a Brightness/Contrast layer. Settings: Brightness -28 and Contrast +33. 2. Using a soft, round, black brush mask out the right side of the girl so only the left side is darker. 3. Create and clip a Color Balance layer. Settings: Red +2 and Blue +27. 4. Using the same brush, mask out the girl’s face and upper right hand of the body.

To finish up the girl, let’s add her shadows.
1. Create a new layer below your little girl layer. Set it to Soft Light. 2. Using a medium, soft, round brush paint black behind the left side and bottom of the girl. Slowly build up the black. 3. Create a new layer above the last layer you created, and keep it set to normal. 4. Using the same brush paint a dark brown behind the little girl’s head.

1. Create and clip a new layer into your bear layer. Set it to “Multiply”. 2. With a small, soft, dark brown (#0e0a08) brush paint directly below the little girl, keeping the bear’s fur and leg shape in mind. Like with all shadows slowly build them up.

Group all your little girl layers together, other than the layer in the “Bear” group, and name it “Little Girl”.
Layers:

Step Five: Color Correction and Lighting To finish up our image and bring it all together we are going to add quite a few adjustment layers.
First, let’s add a simple lens flair. Create a new layer above all your other layers/groups. With a very large white brush paint a giant blob of white in the upper left-hand corner of the image. Set the opacity to 50%.

Finally, let’s do out over all color. These layers are ordered from bottom to top, and will be placed above all other layers and groups.
1. Create a Color Lookup layer. Settings: Filmstock, Opacity 18% 2. Create a Color Lookup layer. Settings: Soft Warming, Opacity 25% 3. Create a Color Lookup layer. Settings: Fall Colors, Opacity 48% 4. Create a Color Lookup layer. Settings: (Device Link) Smokey, Opacity 70%
1. Create a Color Lookup layer. Settings: (Abstract) Gold-Crimson, Opacity 25% 2. Create a Color Lookup layer. Settings: DropBlues, Opacity 41% 3. Create a Gradient Map layer. Settings: Black and white, Layer mode Overlay, Opacity 13%
And you are done! Here is the final result:

Feel free to experiment with lighting colors and style! Tutorials should be seen as a guide, not a step by step rule book. The more you think outside the box, and the more patient you are the better your results will always be!
Final layers:

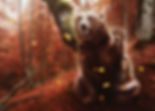
Bonus Step: Add Flowing Leafs! To add a bit more detail and celebrate the Fall season, we are going to add some flowing leafs.
1. Find some leafs (image #23060519) and remove them for their background. 2. Position and arrange them throughout your scene.
1. Create and clip a Color Balance layer into your leafs. Settings: Red 22, Green -19, and Blue 37. 2. Create an clip a Brightness/Contrast layer into your leafs as well. Settings: Brightness -122 and Contrast -50.

Using the lasso tool with a slight “Feather” amount, select the edges of the leafs.

Go to Filter > Blur > Radial Blur. Settings: Amount will depend on the size of your image. Method Spin, and Quality Best.

1. With a soft black brush, mask out the edges of the leafs that should be more lit on the Brightness and Contrast Layer. 2. Duplicate the leafs layer and create as many leafs as you would like, bother in front and behind your bear. For the leafs closer to the foreground, blur them using Gaussian Blur.

And there you have it! Well done for getting through all the steps, hope you’ve got them all down pat! If ever you need any clarifications on the process, do drop us a note. We’re always listening!
Other Warm-Hearted Tutorial You Might Like: