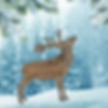
The long holidays are dawning on us and boy, do we love basking in all the wonders of this magical season! Time to start channeling some of that magic into our designs, yes? In this tutorial I’ll show you how to create a fantasy Christmas deer using adjustment layers, masking and brushes. You’ll learn also how to adjust color and enhance the depth of field.
Final Result:

Level: Advanced Program: Photoshop CC Time: 90 minutes
Resources Used:
Background: #34387873
Deer: #45581591
Pine branch: #10474297
Berry branch: #49139763
Christmas ornaments 1: #48408878
Christmas ornament 2: #12084222
Snow brushes: Devianart
Step 1
Create a new 1000×1000 px document in Photoshop and fill it with white. Open a winter background image and use the Move Tool (V) to drag it into the white canvas.

Step 2
Go to Filter > Blur > Gaussian Blur and set the radius to 6 px

On this filter mask, use a soft black brush to erase the foreground and leave the background blurred.

Step 3
Isolate the deer from the background and add him to the middle of the ground.

Go to Edit > Puppet Warp to change his feet position a bit to fit the perspective of the ground. Drag the points of the feet a bit forward.

Step 4
Click the second icon at the bottom of the Layers panel to add a mask to this layer. Use a medium-hard black brush to blend the feet with the snowy ground and remove most of his horns.

Step 5
Make a new layer under the deer layer. Load his selection by holding the Ctrl key and clicking the deer thumbnail layer .

Fill this selection with black and lower the opacity of the layer to 30%. Flip it vertically by choosing Edit > Transform > Flip Vertical and move it under the deer feet.

Step 6
Apply a Gaussian Blur of 3 px to soften the shadow.

Make a new layer and use a soft black brush with the opacity about 40% to paint the missing shadow under the deer’s feet.

Step 7
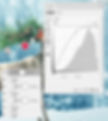
Create a new layer and set it as Clipping Mask. Alter the mode to Overlay and fill with 50% gray. Use the dodge and Burn Tool (O) to change the light and shadow of the deer. You can see how I did it with Normal mode and the result with Overly mode.


Step 8
Add a Hue/Saturation adjustment layer and bring the Saturation value down to -35:

Step 9
Use a Color Balance adjustment layer to change the deer’s color:

Step 10
Make a Curves adjustment layer and brighten the deer. On this layer mask, use a soft black brush to erase the lower part of the deer to refine the light and shadow to fit the light of the background.


Step 11
Cut out the pine branch and add it to the horns’ area. Use Ctrl+T to rotate the branch to fit the head’s perspective. Add a mask to this layer and blend the branch with the head using a soft black brush.

Step 12
Duplicate this layer and make it much smaller. Move it to the bottom of the horns.
Step 13
Select the branch layers and press Ctrl+G to make a group for them. Change this group mode to Normal 100% and use a Color Balance adjustment layer to match the branches color with the background.

Step 14
Use a Curves adjustment layer to brighten the branches.

Step 15
Isolate the berries branch from the background and place it in the top right of the scene to fit the look’s direction of the deer. Duplicate this layer twice and make them smaller. Move one above the pine branch and one to the bottom left of the canvas. Use a layer mask for the one on the pine branch to remove the unnecessary parts of th1 e branch .

Step 16
Apply a Gaussian blur of 3 px to the one on the bottom left. It helps to increase the depth for the scene.

Step 17
Make a group for these branches and add a Hue/Saturation adjustment layer within the group. Lower the Saturation value to -31.

Step 18
Use a Curves adjustment layer to make these branches brighter

Step 19
Add the ornament 2 under the pine branches after cutting it out from the background. Use a layer mask to remove the bow on the both sides.

Double click this layer, choose Drop Shadow to make shadow for the ornament.

Step 20
Use a Curves adjustment layer to brighten the ornament.

Make a Color Balance adjustment layer to change the ornament’s color.

Step 21
Add more ornaments to the deer’s head using the ornaments 1 image.

Use a Hue/Saturation adjustment layer for two of the ornaments to make them appear different from the rest.


Step 22
Make a group for these ornaments and use a Curves adjustment layer to make them much brighter.
Step 23
Create a Gradient Map adjustment layer on top of the layers and pick the colors #e10019 and #00601b. Lower the opacity of this layer to 20%.

Add a Color Balance adjustment layer and change the Midtones settings:

Make a Curves adjustment layer to increase the light for the whole scene.

Step 24
Make a new layer and turn the foreground to #dffdfa. Use one of your favorite snow brushes to paint over the picture (it’s better to choose the one similar to the snow on the background).

Apply a Gaussian Blur of 2 px to soften the snow effect.
Step 25
Time to add some colors to the scene. Create a new layer and use a soft brush with the color #dc5976 to paint over the canvas. Change this layer mode to Overlay 100%.


On a new layer, use an yellow brush to paint on the bottom right of the scene. Alter this layer mode to Soft Light 100%.

Paint on the right side and the front of the deer with the color #59a9dc. Set this layer mode to Overlay 100%:

Step 26
Create a Curves adjustment layer on top of the layers to change the scene’s color a little.

Use a Vibrance adjustment layers to enhance the final effect.
Result:

And that’s it! A very whimsical picture that sits perfectly as a greeting card background, don’t you think? Happy holidays and Merry Christmas to those who are celebrating! And of course, do feel free to suggest new tutorial ideas for year 2017!
Other Holiday Themed Tutorials That You Might Love: