In today’s tutorial you’ll learn how to create this fab photo manipulation that is both sweet and spicy! By picking photos that work perfectly together, you can achieve your own unique honey drenched concept. So let’s get started!
Software: Adobe Photoshop CS6
Difficulty: Intermediate
Completion Time: 1 hour
Images Used For This Tutorial

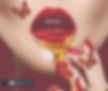
Red sexy lips and nails closeup manicure and makeup:21558832 ©subbotina

Three monarch butterflies isolated on white flying towards center of frame: 6693753 © Jordan McCullough
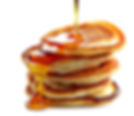
Stack of pancakes on white background: 24436219 © magone
Position and Warp the Syrup
Step 1
Open all your reference images in Photoshop. Use the Lasso Tool (L) to make a selection around the syrup and paste it onto the lips. Go to Edit > Free Transform > Flip Horizontal and position it into place on the lip.

Step 2
Let’s warp the syrup so that it sits better on the hand. Control-T to Free Transform and select Warp to push the syrup around so that it looks like it’s spilling onto her finger.

Use the Eraser Tool (E) to erase the parts of the pancake that are still there and to allow for the glossy lips to show through.

Step 3
Continue the same process as before, adding more “honey” to the left side of the lips.

Step 4
As you continue to add more honey, use a soft eraser to blend parts of the honey together. Then use a hard edged eraser to clean up the edges. Try your best to make this look seamless for a realistic effect.

Step 5
Now let’s create drops of honey! Use the Lasso Tool (L) to select a portion of the syrup. Because it is naturally round, we can easily manipulate it into drop form.

Control-T to Free Transform and select the Warp option. Try to warp the syrup into a perfect little honey droplet, cleaning up the edges with the Eraser Tool (E) at 100% Hardness and 100% Opacity.

Step 6
Right-click to make duplicates of the honey droplet. Position them neatly onto the fingernails and resize them however you see fit.

Step 7
Using the same techniques from the beginning, add another bit of honey onto the hand where the original drop is spilling. Warp it to fit the shape of the finger and use the Clone Stamp Tool (S) to cover any parts of pancake showing through.

Add Butterflies
Step 8
Extract a monarch butterfly from the reference and copy and paste it onto the canvas. Resize and position it so that it elegantly sits on one of her fingers. Set the layer to Multiply, then Right-click to Duplicate it and position another butterfly onto her cheek.

Step 9
Now let’s add some interesting color effects! On a new layer, fill it with a pale purple color (#bb9fa3), and set it to Pin Light.
On a second layer above the purple, fill it with a forest green color (#638500) and set the layer to Subtract. Bring down the Opacity to 25%.
Step 10
Lastly, add a New Levels Adjustment Layer for intensity. Set the Shadow to 14, the Midtone to 1.00 and the Highlight to 211.
And that’s it! I hope you have fun making your own beautiful honey drenched effect! Do share your results with us in the comments below or share this Photoshop skill with your friends on Facebook, Twitter, Google or Pinterest!