Autumn is all about colors and pretty little things! This week’s tutorial will focus on creating a surreal doll fairy that will blend perfectly well with this cool season!
Program: Photoshop CS6
Level: Advanced
Time: 45 min.
Images Used:


Step One
Extract and position your model. I opted to remove the hair, and I also thinned out the neck.
Now we are going to add a background to our model. Select a fall background like the one below.
Go to Blur > Gaussian Blur and blur it to where you have something like you see below:
Step Two
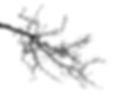
To add branches to our models head, find flat images of black branches on a white background (image#10041408) and set the layer to “Multiply”. Position it accordingly.
Repeat this step a few more times to add more branches.
Now add a layer mask to your model, and with a grunge brush, or a solid round brush, create “texture” on the top of the womans head so that the branches blend in more.
Step Three
Next we are going to add leafs to our faeries branches. To do this find and image of some fall leaves (image#5839537) and extract them. Do not worry about the branches, you just need the leafs. Make sure to keep a large version of the leafs as we will be using this same image for wings later.

Duplicate the leafs and place them throughout the branches on the model’s head.
Once you are happy with the placement of your leafs, group them together and name them “Leafs”. Create a new layer and clip it into the group. Set the layer to “Soft Light”. Now with a round brush paint the leafs red, orange and yellow.
Go back to your original leaf layer, and duplicate it twice. Bring them two layers below your model and set them to “Screen”. Arrange them so that they look like wings.
Now we are going to ad to layer styles to the wings, an inner and outer glow. Inner glow set to Screen, opacity 75%, color #ffffbe, and and semi large size (mine is 46, yours will likely be larger). Outer glow set to screen, opacity 75%, color #ffe075 and a large size.
Step Four
Now we are going to add a glow all around our faerie’s body. Create a new layer behind out model and set it to soft light. With a large white brush set to white, paint around your model. Create another layer and keep it set to “Normal”. Paint more concentrated white around out model’s head.
Create a new layer above that and set it to “Screen”. Paint and orange-yellow and red behind your model’s body.
Step Five
Next, we are going to blend the faerie into her surroundings. First, clip a Color Balance adjustment layer onto our model. Set it to Red 32, Green 4, Blue -27. Next clip a Brightness/Contrast layer into our model. Set it to Brightness -12, and contrast 100.
Clip a new layer into our model and keep it set to “Normal”. Paint white around the edges of out model’s body.
Clip a new layer above that and set it to “Screen”. Paint a yellow-orange color around your models face and body to give her a glow.
Create and clip on last new layer into out model and paint her hair black so that it blends with the branches coming from her hair.
Go back to our original branch layers, duplicate one, shrink it, and clip it into out model’s layer. Place it so that the branches are laying on her face.
Now duplicate that layer and move it slightly down and over, then add a subtle Gaussian Blur to create a shadow for the branches on the head.
Step Six
To create the faerie’s makeup we are going to also use the leafs from her head. Duplicate a few leafs and place them around the model’s eyes.
Mask out any part of the leaf that is covering the eye.
Group the leafs together and set the group layer mode to “Overlay”.
Do the same to the other eye.
Step Seven
Finally we are going to bring everything together using some bokeh and adjustment layers. Create a new layer above all other layers and set it to “Screen”. With a bokeh brush paint red, yellow and orange around your image. Blur out the bokeh if needed. You can also use a bokeh texture if you do not have a brush.
Lastly we are going to warm up the image using three adjustment layers: Color Lookup set to “Soft Warming” Color Lookup set to “Fall Colors” Color Lookup set to “Edgy Amber” Set all three layers to 50%.
And you are done! Did you enjoy this tutorial? Let us know in the comments below!