Foolproof Ways to Enhance the Fall Colors in Your Photos
- Ashley Yeong
- Sep 24, 2021
- 3 min read
Updated: Mar 7, 2023
Autumn. Suddenly the air feels cooler, and you bundle up with a cozy sweater, a mug of hot beverage in hand, the sound of a crackling fire in the back. Of course, the whiff of pumpkin spice in everything. That’s how you know fall has arrived.
The fields of green at your nearby park have turned into shades of oranges and red. It’s the perfect temptation to dust out your camera and take some outdoor portraits or shots of landscapes documenting these golden hues.
Not many photos look good raw and without edits. After looking at that photo you just snapped, you realize the colors don’t nearly give it the justice it deserves. This is where Pixlr comes in!
In this article, learn how to enhance and emphasize those rich fall colors using Pixlr.
1. Adjust the Vibrance
Vibrance intensifies muted colors in a photo, making it the perfect tool to enhance a photo you took where the color of the leaves doesn’t look as vibrant as they do in person.
Also important to note that Vibrance is different from Saturation. Saturation will intensify all the colors of the image, possibly blowing the colors out of proportion. Thus, turning it into an unflattering pile of oversaturation.
On Pixlr, Click on Adjustment > Vibrance
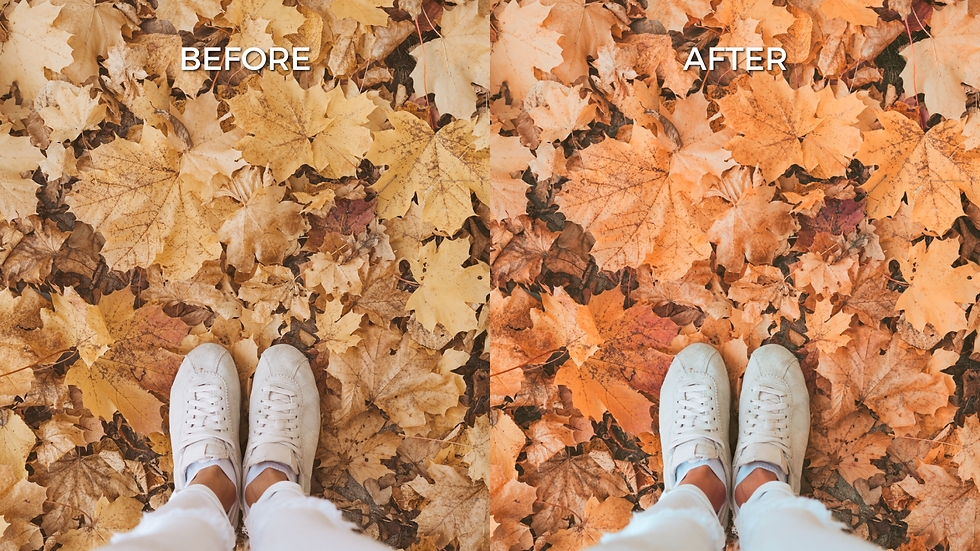
Here’s a before and after:

Playing around with the Vibrance really helped bring out the oranges and yellows on the trees.
2. The hues of autumn
If the color of leaves doesn’t look quite as right, or perhaps autumn isn’t in full swing yet, another way to emphasize the fall colors in your photo is to adjust the hues. There are countless hues and shades in a color. During fall, it ranges from burnt oranges to buttery yellows. By adjusting the hue, you can achieve the exact look you want.
Click on Adjustment > Hue & saturationAdjust the hue to your desires.

This photo is edited with -9 on the Hue slider, along with some adjustment on the Brightness & contrast, Highlights & shadows.
3. Color temperature

Any self-respecting photographer knows the importance of lighting. Color temperature is what we call the warmth and coolness of light. Those varying temperatures emit a different feeling.
During cloudy days, the photos you took might look much ‘colder’, so you’ll want to add warmer tones to really bring out that golden fall lighting and maximize those fall vibes. On the other hand, you can also make the image cooler-toned for a cozy look if that’s the style you’re aiming for!
4. Play with color balance
Without getting too technical and delving into the explanations of CMYK and RGB. The color balance sliders are used to decrease or increase the amount of red, green, or blue in a photo’s shadows, mid-tones, or highlights.
To use the color balance sliders, click on Adjustment > Color Balance.

Original Image by jovanmandic, 123RF. Edited in Pixlr E.
For example, the photo is edited with color balance adjustments on the mid-tones (Red +11, Blue -13) and some added vibrance.
BONUS: Adding fall leaves

Original image by evgenyatamanenko, 123RF.
It’s difficult to resist a pile of autumn leaves. Your inner kid just wants to pick the leaves up and toss them. It also makes for a great photo opportunity! Fall leaves in mid-air add some movement and an interesting element to the photo.
After countless tries, you just can’t seem to get the shot. Perhaps the wind isn’t working in your favor, or maybe your camera can’t capture the action quick enough. Don’t worry about it! You can always add them in post-production using Pixlr.
Open up an image of autumn leaves on Pixlr, then use the Magic Wand tool (found on the left sidebar) to remove the unwanted background.
Next, go to the top bar and select Filter > Details > Motion Blur. Motion Blur is used to create that realistic movement of the leaves. If you want to play with adding leaves in the foreground to add depth, use Blur. Adjust the slider based on your preferences!
Get out there and start doing photoshoots!
Go out there, snap some photos and start editing! The autumn hues only last for so long. To have a beautifully edited photo, incorporate all those steps and adjust those hues and color balances according to your photo!
We hope these tips and tricks help take your photo editing up a notch. Have fun creating, and don’t forget to be part of our Pixlr community on our social media platforms!


Comments