The Lunar New Year is an important celebration for our Chinese friends, it’s akin to their New Year and goes according to the Chinese calendar. So to celebrate this momentous year of the Rooster, here’s a tutorial to add some oriental sparkle to your designs.
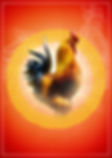
Final Image:
Level: Advanced Program: Photoshop CS6, Windows 10 Time: 2 hour
What We Will Be Learning: In this tutorial, we will be learning how to create Chinese New year poster to celebrate the year of the Rooster!
This tutorial assumes you have knowledge of basic Photoshop functions such as adjustment layers, layer masks, and layer effects.
Images Used: Rooster: #48571407
Texture: #32205544
Note: At the end of each step there is an image of what my layers look like at the point of that step in case you get lost!
Step One: Creating the Background First, we will be putting together our background. The dimensions are 2480 x 3508 pixels.
1. Create a Color Fill layer filled with the color red (#e40f0f).
2. Find a grungy texture (image #32205544) and place it on your canvas, setting it to “Overlay”.
3. Clip a Brightness/Contrast adjustment layer into your texture. Settings: Brightness 37 and Contrast 100.
1. Create a new layer.
2. With a very large round brush, paint a giant white blob in the middle of your canvas.
3. Create a new layer and set it to “Screen”.
4. With the same brush, paint another blob in the center of the canvas only this time with an orange/yellow color (#ffa500).
1. Create a new layer and set it to “Soft Light”. 2. Paint the majority of it white, except the corners which you will paint black. This will cause a gradient effect.

1. Create a new layer and set it to “Screen”. 2. Using any “burst” or “sunburst” brush paint a burst coming from the middle of your canvas using a yellow (#ffd373) color.
Layers:

Step Two: Adding a background Illustration Next, we are going to add a background illustration of a rooster while also adding a border.
1. Using the Rectangle Tool Create a white rectangle covering most of your canvas.
1. With your rectangle tool active, in the shape toolbar, fine Fill and set it to “none” (the box with a red line through it).
2. Set the stroke to white and “10pt”.
1. Import a rooster illustration (image #63602591) and change it to a solid white.
2. Place it in the center of your canvas.
3. Add a layer mask and mask out the feet.
1. Using the Rectangular Marquee Tool delete the parts of the rooster that pass the border. 2. Merge the Rooster and border later together. Set the opacity to 25%.
Layers:

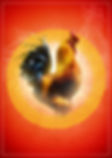
Step Three: The Rooster Now, we are going to add out main subject: the rooster.
1. Find a rooster image (image #48571407) and extract it using your preferred method.


1. Add a layer mask and using a large soft brush mask out the bottom half of the rooster.

1. Create and clip a new layer into your rooster. Set it to “Screen”. 2. Using a soft round brush, paint orange (#f0aa13) around the edges of your rooster.

1. Create and clip a new layer into your rooster. Set it to “Overlay”. 2. Using a soft round brush set to a low flow (around 10-20%) paint white on the highlights of the rooster and black on the shadows to add more contrast and shine to the feathers.

1. Import a ring Illustration (image #49190441). Place it below your rooster.
Group all the rooster layers into a group named “Rooster Body”
Next, we are going to give our rooster a larger tail.
1. Using the Lasso Tool section off your rooster’s tool and then copy and paste. 2. Place the copied tail below the Rooster Body group. Position it so that the feathers look like they are coming from behind the original tail. Use the Warp Tool if needed.

1. Do the same thing one more time. I put this peace in the middle of the original tail and the first copied tail layer.

Do these next 2 steps on both tail section layers!
1. Create and clip a new layer into the tail section. Set it to “Screen”. 2. Paint yellow (#ffb635) light on the top half and sides of the feathers.

1. Create and clip a new layer into the tail section. Set it to “Normal. 2. Paint black on the bottom of the feathers to create shadows where needed.

Layers:

Step Four: Extra Details
1. Taking the same texture you used for the background copy and place it above all your other current layers. 2. Keep it set to “Overlay”. Set it to around 40% opacity. 3. Create a new layer and set it to “Screen”. 4. Using a soft round brush, paint yellow (#ffb322) over the edges of the rooster.
Layers:

Step Five: Adding Text Next, we are going to add our text. You can either make it black or white. I am choosing white.
1. Using the font “LeviBrush” type out “Rooster” on the top of your poster in a very large font size. 2. In an ever larger font size type out “2017” on the bottom of your poster.

1. Using the font “The Constellations of Heracles” type “Happy New Year” above “2017”. Leaving room on the left side.

1. Import and place a second illustration of a rooster (#55760081) on the left side of the “2017”. Make it white.

Layers:

Step Six: Color Finally, we will bring everything together with some final color adjusting. These are in order from bottom to top and are to be placed over all existing layers.
1. Color Lookup layer: Edgy Amber, Opacity 64% 2. Color Lookup layer: Teal Orange Plus Contrast, Opacity 27% 3. Color Balance layer: Red 9, Green -11 and Blue -12
And you are done!

Layers:

And that’s it! You’ve got a lovely picture to ring in the Lunar New Year with! Or you can even forgo the text and use this as a generic poster image for any occasion! Let us know what you think or would like to see in the next tutorial!
Other Tutorials You Might Also Like To Try: