The final month of 2016 brings much merry-making and festivity. It’s also winter season for some of our Northern neighbors so here’s a tutorial that seeks to bring back those childhood memories of playing in the snow and making snow angels!
Level: Intermediate Program: Photoshop CS6, Windows 10 Time: 4 hours
What We Will Be Learning: In this tutorial, we will be creating a snowy night child’s portrait! It will be very stylized and give off a fantasy feel. This is great for any Christmas portrait, or just for any winter loving child. We will also be exploring one way to turn an image from day to night time. This tutorial does require Photoshop CS6 or higher to achieve its day to night look.
This tutorial assumes you have knowledge of basic Photoshop functions such as adjustment layers, layer masks, and layer effects.
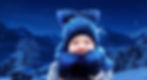
Final Image:

Images Used:
Snowy Forest: #37342940 @jakobradlgruber
Child: #50082841 @Olesia Bilkei
Lights: #45120467 @Chon Kit Leong
Note: At the end of each step there is an image of what my layers look like at the point of that step in case you get lost!
Step One: Creating the Background
1. Find an image of a snowy landscape (#37342940) and crop it.

Create a new layer using the Gradient tool, create a dark blue gradient coming from top to bottom.

Set that layer to “Multiply”, and a 43% opacity.
Create a “Curves” adjustment layer. Below are the settings:

1. Find a starry sky image (any will do) and align them side by side. 2. Using a large soft brush, erase the edges of each of the star images so that they blend together better. Erase any stars that you don’t like or look too repetitive, as well.

1. Merge the star images together. Create and clip a black and white “Gradient” layer into the large star image. 2. Create and clip a “Curves” layer into the large star image as well. Below are the settings:

Results:

1. Set the large star layer to “Screen”. 2. Erase any stars that are not in the sky (that are in the mountains). 3. Duplicate and flip the large star image to add more stars.

Group all the star layers together into a group named “Stars”.
1. Finally, we are going to merge ALL the images we just created together. Then, go to Filter > Blur > Field Blur. Settings will depend on your preferences. You can make a duplicate of the layers and merge that instead, like I did, as well.

Layers:
Step Two: Adding Snow
1. Create a new layer and fill it with black. 2. Go to Filter > Noise > Add Noise. Settings: Distribution > Uniform and monochromatic box checked. Amount will depend on the size of your image.
3. Stretch out the noise layer to about twice it’s size so that the noise is larger.

Create and clip a curves layer into your noise layer. Settings:

Results:

Set the noise layer to screen. What you will get is very tiny faints snow!
Zoomed in:

1. Next, I added more snow using just regular snow brushes on a new layer. You can find them all over the Internet, very easy to find! 2. After painting your snow, select the whole canvas using the Rectangular Marquee Tool and go to Filter > Blur > Radial Blur. Settings: Amount will depend on the size of your image. Blur Method “Spin”. Quality “Best.”

Group all your snow layers together in a group named “Snow”.
Layers:

Step Three: Color Correcting the Background To finish up the background we are going to do some color correcting with just three different adjustment layers that should be placed above your “Snow” group. They are listed from bottom to top.
1. Create a Color Lookup layer: Filmstock, 42% opacity. 2. Create another Color Lookup layer: Crisp Winter, 69% opacity. 3. Create a Gradient Map layer: Settings Below, 49% opacity.

Result:

Layers:

Step Four: Adding our Model
1. Find an image of a young child (#50082841). Extract and place him on the right-center of the canvas.

1. Create and clip a Brightness and Contrast adjustment layer into your model. Settings: Brightness 4, Contrast -50. 2. To give the image a highly styled look, we are going to do some major dodging and burning. Create and clip a new layer into our model. Set it to “Overlay”. 3. Using a soft round brush, with a Flow Rate of around 10%, paint white on the highlights and black on the shadows.
1. Create a new layer, above your Overlay layer, and set it to “Multiply”. 2. With a large soft brush paint a dark blue (#0c1423) shadow over the front of the child. Set the layer opacity to around 50%.

1. Create and clip a Brightness and Contrast layer above your Multiply layer. Settings: Brightness -11, Contrast -29. Using a large soft brush set to black mask out the left side of the adjustment layer. 2. Create and clip a black and white Gradient adjustment layer above your B/C layer. Set it to 35% opacity. 3. Create and clip a Color Lookup layer into your model. Settings: Night From Day, 85%. 4. Create and clip another Color Lookup layer into your model. Settings: Crisp Winter, 54%.

1. Finally, create and clip a new layer into your model. Set it to “soft Light”. 2. With a large soft brush, paint white on the left side of your model to add more light.

Group all your model layers together and name the group “Model”.
Layers:

Step Five: Glow and More Snow Now we are going to add some background glow and some more snow to the foreground.
1. Create a new layer below your “Model” group. Set it to “Overlay”. 2. With a large soft brush paint white all around your mode but focusing more on the left side. 3. Create another new layer and set it to “Soft Light”. Do that same this you did above, to intensify the light. Lower the opacity of either layer if needed.

Using the same snow brush (or texture!) you used in the background, place some snow in front of the model.

Layers:

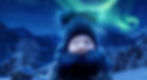
Step Six: Quick and Easy Aurora Borealis To give our image a bit more magic and color we are going to add some southern lights.
1. Find an image of some skylights (#45120467). Place it in the top right corner. 2. Add a layer mask and mask out the bottom half, we only need the sky. Set the layer to “Screen”.

Clip a Brightness/Contrast layer into your lights. Settings: Brightness -110, Contrast 77.

1. Create a new layer above your model. Set it to “Screen”. 2. Using a large soft round brush paint the same green the lights are over the top right corner of your model.
Layers:

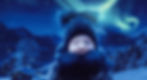
Step Seven: Final Color Correction Finally, we are going to add out last two layers, these should be above all other layers.
1. Create a Selective Color layer. Settings: Go into the “Blues”, Magenta 6, Yellow -9, and Black 11. 2. Create a Color Lookup layer. Settings: (Abstract) Cobalt-Carmine, 48%.
And you are done!
Final Layers:

Don’t forget to always experiment and try new things! This is a very versatile effect and can be combined with a million other effect. Let us know if you love this winter tutorial!
Other Winter-Themed Tutorials That Will Warm Up Your Designing Skills