How To Create A Water Galaxy Image Using Photoshop
- Jan 4, 2017
- 4 min read
Happy New Year peeps!
A great time to learn something new and start the year right. Being skilled in Photoshop will allow you to create images that are to your liking and need. If you are new to design, welcome! If you are a pro, well, take this as a refresher tutorial to brush up your skills!
Level: Intermediate Program: Photoshop CS6, Windows 10 Time: 1 hour What We Will Be Learning: In this tutorial, we will be learning how to create a very surreal effect of floating in a galaxy. This is an incredible quick effect, while still offering stunning visuals.
This tutorial assumes you have knowledge of basic Photoshop functions such as adjustment layers, layer masks, and layer effects.
Images Used: Woman: Image #37094024
Galaxy: Image #8915041
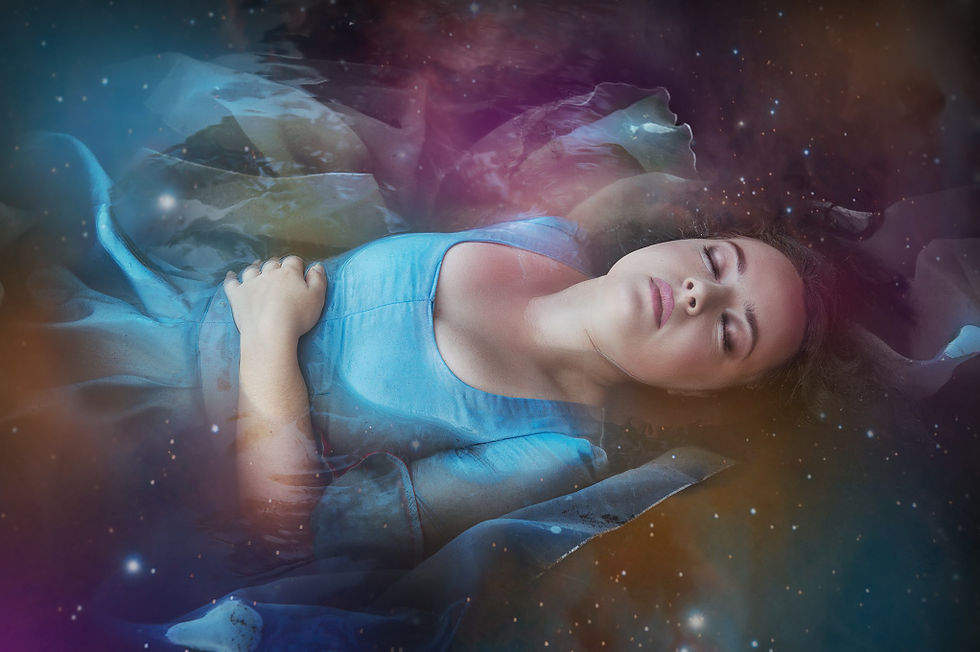
Final Image:

Step One: Prepping the Original Image First, we are going to remove the leafs, sticks, and any other debris in the original images (Image #3709402) water.
Remove the smaller leafs using the Clone Stamp tool.
1. Do this by holding the Alt key. 2. Click on an area near/similar to what you want to cover up, then stop holding alt. 3. Click on the leaf you want to hide.
It’s much more simple than it sounds! Just play around with it, there are several tutorials explaining the Clone Stamp tool if you need additional help.
Original Image:

Edited Version:

Next, Remove the larger twigs and grass using the Patch tool.
1. Right click on the Healing Tool and select the Patch Tool. 2. Create a selection around the leafs in the upper right corner. 3. Click and drag so that it gets replaced with water.
Again, it’s much more simple than it sounds! And there are more in-depth tutorials on the Patch Tool.
Do this to hide the green leafs in the top and bottom right-hand corner.

Layers:
Step Two: Adding Contrast We will need to add some contrast before we add our galaxy effect.
1. Create a new layer above your model. Set it to “Soft Light”. 2. Using a large, soft, round brush paint white on the model’s face and black towards the bottom of the model’s dress and around her hair.

1. Now, create a Brightness/Contrast adjustment layer. Settings: Brightness 51 and Opacity 46%. 2. Using a soft round brush set to black, paint on the layer mask to mask out the middle portion of the adjustment layer. The red below indicates where I painted black.

1. Double click on your layer to bring up the Layer Style panel. 2. Set the Underlying Layer settings in the Blend If section to what you see below:


Next, create a new layer. Set it to “Overlay”. Using a small, soft brush set to a low brush flow of around 20%, paint white where the model has highlights and black where her shadows are. Also, be sure to focus on her makeup and facial features. We want her to be very stylized.

Notice her eye shadow is much more intense. Now, lets up the contrast and darkness of the water, while also removing some of the color, with a Black and White Gradient Map adjustment layer.
1. Create your Black and White Gradient Map. 2. Using a large, soft, black brush mask out as much of the model as you can. The red below is what I masked out.


Create a new layer. Set it to “Soft Light”. Using a very large, soft, round brush paint white in the middle of your image and black around the edges. Keep it very soft and subtle.

Layers:

Step Three: The Galaxy Next, we will be creating our galaxy water.
1. Find an image of a nebula or galaxy (Image #8915041). 2. Place them around your model.

1. Erase all the edges of the galaxies with a soft round brush so they all merge together into one big image. 2. Set the layers to “Lighten”.

1. Merge all the images together and stretch the image larger using the Transform Tool. 2. Create a new layer and set it to “Screen”. 3. Using a very large, soft, round brush paint blobs of blue, orange and pink in your water/galaxy. Set the layer to 50%.

1. Create a Curves adjustment layer and set it to the settings below:

1. Fill the layer mask with black. 2. Paint white using a large, soft, round brush to bring the blue tone in random blobs around the image.

1. Group all your galaxy image together. 2. Add a layer mask to the group, and mask out any galaxy on the model, and any part of her dress that is above the water. The red below shows where/what I masked.


Layers:

Step Four: The Final Touches
1. Create a new layer. Set it to “Lighten”. 2. Create blobs of color, just like you did before, around your model. You want them to be on her, but only on her edges, not the middle of her body. 3. Lower the opacity to 20%. 4. Duplicate that layer and set it to “Soft Light”.
Finally, we are going to do our final color correcting. These layers are listed from bottom to top and should be placed above all other layers.
1. Brightness/Contrast adjustment layer. Settings: Brightness -21 and Contrast 48. 2. Color Lookup Adjustment Layer. Settings: (Abstract) Cobalt Carmine, opacity 39% 3. Color Lookup Adjustment Layer. Settings: 3Strip 4. Color Lookup Adjustment Layer. Settings: Crisp Winter, Opacity 45%, Layer Style:

Color Balance Adjustment Layer: Red 16, Green 1, Blue 23.

Layers:
And you are done! What do you think of this tutorial? Share your effect with us, we love hearing from you!
Other Surreal Effect Tutorials You Must Try Out As Well:


Comments